Marzban VPN Panel: How to Install and Configure from Scratch, Plus a Comparison with 3X-UI and Hiddify
Step-by-step guide to installing and setting up Marzban for VPN from scratch in 1-2 hours. Learn how to launch the panel, grant access, enable SSL, configure plans, backups, and monitoring. Ends with a comparison to 3X-UI and Hiddify plus honest recommendations.
Content of the article
- 1. introduction
- 2. preliminary preparations
- 3. basic concepts
- 4. step 1: preparing the server and access
- 5. step 2: setting up domain and dns
- 6. step 3: installing docker and docker compose
- 7. step 4: configuring reverse proxy and ssl
- 8. step 5: installing and launching marzban
- 9. step 6: configuring protocols, plans, and users
- 10. result check
- 11. common errors and fixes
- 12. additional features
- 13. comparison with 3x-ui and hiddify
- 14. final result check
- 15. faq
- 16. conclusion
1. Introduction
In this step-by-step guide, you’ll install and configure the Marzban panel to manage your own VPN server based on Xray. By the end, you’ll have a fully functional admin panel running over HTTPS, ready-made user configurations, basic pricing plans, and a straightforward set of commands for maintenance. We’ll cover everything from choosing your server and domain to setting up regular backups and updates. Along the way, you’ll also understand the key differences between Marzban, 3X-UI, and Hiddify and choose the best fit for your needs.
This guide is perfect for beginner admins, project owners looking to control their own VPN, and anyone setting up an Xray panel for the first time. Advanced topics are specially marked.
What you should know beforehand: basic Linux commands, how to connect via SSH, edit files, and manage packages. All commands are listed clearly with checks.
Time required: 60 to 120 minutes on a clean server. If you already have a domain and Linux experience, you’ll be even faster.
2. Preliminary Preparations
Required Tools and Access
- A VPS or dedicated server running Ubuntu 22.04 or 24.04 LTS.
- A domain name for accessing the panel (e.g., panel.example.com).
- SSH access to the server with a user having sudo privileges.
- Ability to open ports 80 and 443 in your firewall and provider’s control panel.
System Requirements
- At least 1 vCPU and 1-2 GB RAM to start; for 100+ active users, 2 vCPUs and 4 GB RAM is recommended.
- Open ports 80 and 443 for HTTPS, and port 22 for SSH.
- At least 10 GB of free disk space.
What to Install
- System updates and basic utilities.
- Docker and the docker compose plugin.
- Nginx and Certbot for TLS certificates, or built-in automation through a reverse proxy in Docker.
Backups
If you already have important data on the server, create a backup first. For a fresh clean server, you can skip this step, but later we’ll add routine backups for the panel.
Tip: Keep a local notes file for all important passwords, keys, and commands. This makes recovery quick if you need to migrate or fix issues.
3. Basic Concepts
Key Terms
- Marzban — a VPN management panel built on Xray, allowing you to create users, issue configs, limit traffic and time, and connect multiple nodes.
- Xray — the backend server supporting protocols like VLESS, VMess, Trojan, and more, handling transport and encryption.
- Reverse Proxy — a proxy like Nginx or Traefik that accepts HTTPS on port 443 and forwards requests to internal services.
- SSL/TLS — encryption for HTTPS to keep your panel secure.
- Docker — containerization simplifying installation and updates.
How It Works
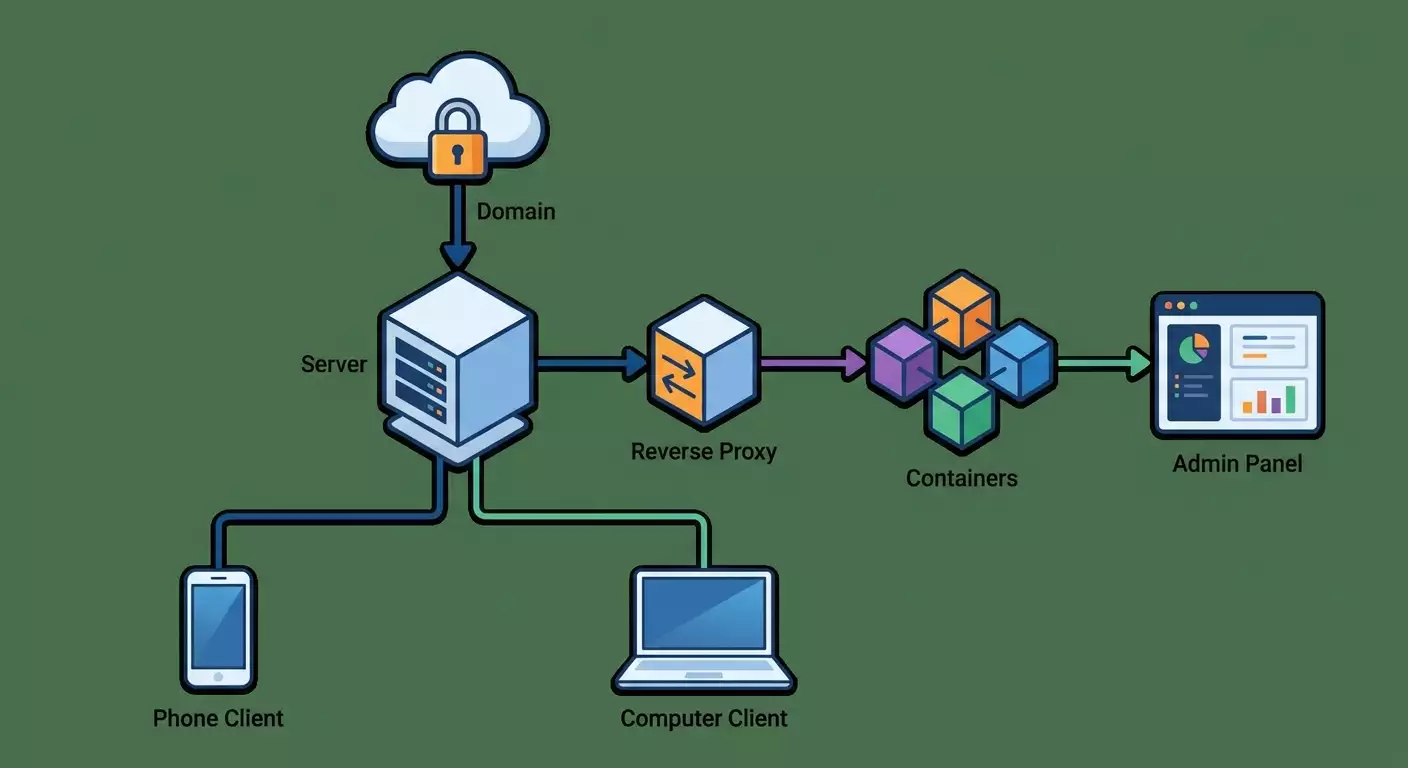
Users connect to your server via Xray protocols. The Marzban panel stores and issues settings, tracks traffic and time limits, and manages multiple nodes if needed. To have the panel accessible over HTTPS, we use a domain and a certificate. For stability and easy updates, we run the server and panel inside Docker containers.
Key points to keep in mind: the domain must point to your server’s IP; ports 80 and 443 must be open; your certificate must be valid; Docker must run without errors; and the panel should run as a service, restarting automatically after failures.
4. Step 1: Preparing the Server and Access
Goal
Update the system, enable basic security, ensure SSH access, and open necessary ports.
Detailed Instructions
- Connect to the server via SSH as a user with sudo rights.
- Update packages: run
sudo apt updateand thensudo apt upgrade -y. - Install basic utilities:
sudo apt install -y ca-certificates curl gnupg lsb-release ufw jq. - Check internet connectivity from the server:
ping -c 4 1.1.1.1and ensure no packet loss. - Enable UFW firewall:
sudo ufw allow OpenSSH, thensudo ufw allow 80,sudo ufw allow 443, followed bysudo ufw enable, confirming activation. - Verify active firewall rules with
sudo ufw status— you should see Allow for ports 22, 80, and 443. - Find your server’s public IP:
curl -4 ifconfig.coor useip aand locate your provider's IP if the panel shows it.
⚠️ Warning: If your provider has an additional firewall, open ports 80 and 443 there too. Otherwise, issuing certificates will fail.
Tip: If your cloud provider supports snapshots, create one after these basics. It’ll save you time if you need to reinstall.
Expected Result
Your server is updated, ports 80 and 443 are open, SSH works, and internet connectivity is stable.
✅ Check: Run curl -I http://your_public_IP — you should get an HTTP status from your provider’s temporary response or an empty connection error, but no firewall blocks on port 80.
Possible Issues and Solutions
- No SSH access — verify IP and username correctness, ensure the provider doesn’t block port 22, and open port 22 in the provider’s panel.
- UFW installation fails — update package lists and try again.
- Ports 80 and 443 in use — stop services occupying those ports using
sudo lsof -i :80 -i :443and disable unnecessary ones.
5. Step 2: Setting Up Domain and DNS
Goal
Link your domain to the server so the panel is available over HTTPS.
Detailed Instructions
- Log in to your domain registrar and open the DNS editor.
- Create an A record for your panel subdomain, like
panel.example.com, pointing it to your server’s IP. - Save and wait 5–15 minutes. Sometimes it can take up to an hour depending on TTL settings.
- Confirm the record’s active by running
ping panel.example.comon your local machine; it should reply with your server IP.
Tip: Set a short TTL during setup to speed up propagation. Later, increase TTL for stability.
Expected Result
Your domain panel.example.com points to your server’s IP.
✅ Check: Run dig panel.example.com—the ANSWER section should show your IP. If you lack dig, use ping or nslookup.
Possible Issues and Solutions
- Domain not resolving — check A record accuracy, remove extra spaces, verify the subdomain.
- Domain points to an old IP — wait TTL time and check again.
- Provider uses proxy — disable proxying during certificate issuance so HTTP calls reach your server directly.
6. Step 3: Installing Docker and Docker Compose
Goal
Set up containerization to easily deploy and update Marzban and related services.
Detailed Instructions
- Install Docker from Ubuntu repo:
sudo apt install -y docker.io. - Install Docker Compose plugin:
sudo apt install -y docker-compose-plugin. - Add your user to the Docker group:
sudo usermod -aG docker $USER. Log out and back into SSH for changes to apply. - Check versions:
docker --versionanddocker compose version. They should show proper versions without errors. - Enable Docker’s auto-start:
sudo systemctl enable docker. - Verify service is running:
systemctl is-active dockerexpecting the outputactive.
Tip: For isolated settings, create a separate user, add them to the Docker group, and run containers under that user.
Expected Result
Docker is installed and running, Docker Compose is available as a plugin, and you can run containers without sudo.
✅ Check: Run docker run --rm hello-world. It should print a message confirming Docker is installed correctly.
Possible Issues and Solutions
- Docker command unavailable — log out and back in or run
newgrp dockerto refresh your groups. - Service won’t start — check logs with
sudo journalctl -u docker. Old packages or conflicting daemons can cause issues.
7. Step 4: Configuring Reverse Proxy and SSL
Goal
Issue a TLS certificate and set up a reverse proxy for secure panel access. We’ll explore two options: Nginx on the host, and Traefik inside Docker. Choose one.
Option A: Nginx on the Host
- Install Nginx:
sudo apt install -y nginx. - If needed, allow Nginx Full profile in the firewall:
sudo ufw allow 'Nginx Full'. - Install Certbot:
sudo apt install -y certbot python3-certbot-nginx. - Make sure your domain resolves to the server: ping your domain and confirm the IP.
- Issue the certificate:
sudo certbot --nginx -d panel.example.com. Provide your email, accept terms, and opt for HTTP to HTTPS redirect when prompted. - Validate Nginx config:
sudo nginx -tthen reload:systemctl reload nginx. Open https://panel.example.com in a browser to verify HTTPS loads, even if the panel content is not yet ready.
Option B: Traefik in Docker
- Create a shared Docker network for reverse proxy:
docker network create web. - Run a Traefik container exposing ports 80 and 443, attached to the
webnetwork, with auto-certificate issuance enabled for your domain. This single container listens on 80 and 443, stores certs in a volume, and routes requests via labels to services. - Confirm Traefik is running:
docker psshould show the container “Up”.
⚠️ Important: Use only one reverse proxy on ports 80 and 443 at a time. If you choose Nginx on the host, don’t run Traefik simultaneously, and vice versa.
Tip: For production, Traefik or Caddy in Docker are convenient since configs stay close to services and are portable. Nginx is fine to start with due to familiarity.
Expected Result
Your domain opens over HTTPS. The reverse proxy accepts connections and is ready to forward requests to Marzban.
✅ Check: Visit https://your-panel-domain in a browser; you should see a valid green lock on the certificate. It’s okay if the content is empty before you finish setup.
Possible Issues and Solutions
- Certificate not issued — verify domain points to server IP and port 80 is open. Disable registrar proxying during validation.
- Port conflicts — stop other services using ports 80 and 443 before starting your proxy.
8. Step 5: Installing and Launching Marzban
Goal
Run the Marzban panel in Docker, link it to your reverse proxy, create an admin user, and access the web interface.
Detailed Instructions
- Create a project directory, e.g.,
mkdir -p ~/marzbanand navigate into it:cd ~/marzban. - Create a docker-compose file with services for the panel and database. For minimal external dependencies, use embedded SQLite. For heavier loads, separate the database in its own container, but we’ll start simple with SQLite.
- Open a text editor and create the docker-compose configuration defining two services:
marzbanand optionally the reverse proxy if you chose Traefik. If using Nginx on the host, Marzban listens locally on port 8000, and Nginx proxies requests to127.0.0.1:8000. - Fill environment variables for the panel: secret key, host and port for internal web server, database path, timezone, and panel URL for correct link generation. Example values:
SECRET_KEYas a random 32-64 character string,UVICORN_HOST=0.0.0.0,UVICORN_PORT=8000, SQLite forDATABASE_URL, your region’s timezone, andBASE_URLas the HTTPS panel address. - If using Nginx, add a server block listening on port 443 for your domain, proxying to
127.0.0.1:8000. Include headersX-Forwarded-ProtoandX-Forwarded-For. Test the config and reload Nginx. - If using Traefik, connect the Marzban container to the
webnetwork and add routing labels by domain. Enable automatic HTTPS redirection if not set yet. - Start the services:
docker compose up -d. Wait 10–30 seconds for containers to fully start. - Check the panel logs:
docker logs -f your_marzban_container_name. Confirm the server listens on port 8000 without errors. - Open a browser and browse to the panel’s HTTPS address. You should see a login page or initial setup wizard.
- Create an admin user via the container CLI or integrated wizard. For CLI: execute the command inside the panel container to create an admin with a username and strong password. Save these credentials safely.
Tip: If the panel page doesn’t load, verify your reverse proxy passes the header X-Forwarded-Proto with the value https. This is crucial for correct link generation.
Expected Result
The panel is accessible via HTTPS. You can log in as admin, see the dashboard with zero stats and an empty user list.
✅ Check: Run docker ps. You should see the Marzban container and your reverse proxy running. The panel URL should load without certificate errors and allow logging in.
Possible Issues and Solutions
- 502 Bad Gateway — make sure Marzban container listens on port 8000 and is reachable internally; proxy is configured correctly.
- Blank screen — check browser console and container logs. Database migrations might be missing; run migration commands inside the container.
- Admin creation fails — try again and ensure your password meets complexity and length requirements.
9. Step 6: Configuring Protocols, Plans, and Users
Goal
Make the panel practical: enable Xray protocols you plan to use, create plans with limits, add a few test users, generate their configs, and verify connections from phone and PC.
Detailed Instructions
- Log in as admin, open the configuration section, and enable the protocols you intend to support: VLESS Reality, VMess, Trojan. Start with one to three protocols based on your users’ needs.
- Configure inbound ports. If 443 is used by the HTTPS panel, use different domains or SNI, or set separate inbound with specific domains. Follow hints in the panel interface.
- Create a plan with reasonable limits, e.g., 50 GB traffic and 30 days duration. Enable auto-deactivation on expiry if supported.
- Add your first user, assigning a login, applying the plan, and optionally setting device limits or forcing protocol use.
- Save issued configurations. The panel typically generates links, QR codes, and export options for clients. Copy VLESS or Trojan URLs or download JSON configs if using OpenVPN or WireGuard optionally through other nodes.
- Test connection on your phone: install an Xray or V2RayNG client, scan the QR code, connect, and confirm internet works through your node. Visit an IP check site to see your server’s IP.
- Test on PC: use a Windows or macOS client, import the link or config file, connect, and test speed.
- Create 2-3 more users for various scenarios: with smaller limits, unlimited test plans, and alternative protocols to verify billing and different use cases.
Tip: Start with one protocol like VLESS over TLS, stabilize it, then add Reality or Trojan. It’s easier to troubleshoot this way.
Expected Result
You have at least one working user successfully connecting through your server. Traffic and time are tracked correctly, and statuses update in the panel.
✅ Check: In the user card on the panel, see an active session or recent traffic recorded. Client shows your server’s external IP.
Possible Issues and Solutions
- Client won’t connect — check domain, certificate, port, and protocol match between client and server. Ensure you use the exact config from the panel.
- Slow speed — verify no speed limits in the plan, check server CPU and network load. Change client routing to full tunnel or split tunnel to isolate local issues.
- Statistics not updating — confirm the panel and node communicate, check system time and timezone, restart services.
10. Result Check
Checklist
- Domain resolves via HTTPS with a valid certificate.
- Panel is accessible and admin login works.
- Plans and users are created.
- Client connections succeed, external IP matches your server.
- Statistics reflect sessions and traffic.
- Containers run and auto-restart on failure.
How to Test
- Simulate a reboot:
sudo rebootand verify panel and proxy restart automatically. - Check certificate auto-renewal: confirm auto-renew is set (Certbot uses systemd timer by default).
- Test plan limits: set a low traffic limit, download a test file, and ensure the panel registers usage and restricts access if configured.
Success Metrics
- Panel response time under 300 ms within your region.
- Client connections stay stable for hours without disconnects.
- Minimal error logs in panel and proxy, mostly informational entries.
Tip: Schedule weekly backups and monthly container updates to avoid technical debt buildup.
11. Common Errors and Fixes
- Issue: Certificate not issued. Cause: Domain doesn’t point to server or port 80 is closed. Fix: Check A record, open ports 80 and 443 in UFW and provider panel, disable proxying during validation.
- Issue: 502 Bad Gateway in browser. Cause: Panel not listening on required port, incorrect proxy upstream. Fix: Ensure Marzban listens on port 8000 and proxy routes to 127.0.0.1:8000, check logs.
- Issue: VPN client won’t connect. Cause: Protocol or domain mismatch, outdated config. Fix: Regenerate config in panel, verify correct protocol and port, restart client.
- Issue: Panel doesn’t start after reboot. Cause: Docker not enabled auto-start or compose not launched. Fix: Run
sudo systemctl enable dockerand start compose in a system unit or cron @reboot. - Issue: Certificate expired. Cause: Auto-renew failed. Fix: Renew manually, verify Certbot timer or proxy auto-issuing settings, ensure port 80 is accessible.
- Issue: Low speeds for some users. Cause: Poor route, overloaded region, limited CPU. Fix: Assign alternative protocol or port, consider moving server closer to users.
- Issue: Stats don’t match expectations. Cause: Timezone or cache. Fix: Set correct TIMEZONE in container, sync time, check usage settings in panel.
12. Additional Features
Advanced Settings
- Multi-node architecture: add nodes in multiple regions so users automatically get the best route.
- Reality protocol: reduces traffic visibility, useful for filtered networks. Configure according to panel instructions, ensuring SNI and keys are correct.
- Quotas and auto-deactivation: detailed plans to control load.
Optimization
- Region choice: place servers closer to users for better latency and speed.
- Compression and TCP tuning: kernel and buffer settings affect peak speeds. Modify cautiously and monitor metrics.
- DNS caching for clients: sometimes reduces latency on repeated queries.
What Else You Can Do
- Backups: create a cron job to archive panel data daily and save to object storage, keeping 7-14 rotations.
- Monitoring: container and health metrics with Telegram alerts on crashes or disk space exhaustion.
- CI updates: regularly restart containers with latest images after testing in staging.
Tip: Make small changes one at a time and document the results. This way you can always roll back to a stable config.
13. Comparison with 3X-UI and Hiddify
When to Choose Marzban
- You need plans, quotas, advanced stats, and multi-node support.
- You’re comfortable with Docker and reverse proxies for flexibility and updates.
- Scalability and control over Xray protocols are important.
3X-UI: Pros and Cons
- Pros: very simple start, minimal dependencies, quick launch on a clean server. Great for a single node and basic use cases.
- Cons: fewer features around plans and multi-nodes. Updates and security require discipline.
Hiddify: Pros and Cons
- Pros: user-friendly installation, automation of many steps, decent beginner option. Often includes presets for various protocols.
- Cons: less flexible for complex topologies and specific restrictions. Some settings are abstracted.
Summary
If you want a panel with sophisticated user management, billing, multi-node support, and good Xray integration, Marzban is one of the more balanced choices. 3X-UI suits fast single-node setups without complex billing. Hiddify is attractive for ease of use but lacks fine-tuning for large deployments.
Tip: Start with a single Marzban node. Once you understand load and patterns, add a second node in another region and enable distribution.
14. Final Result Check
Final Checklist
- Domain resolves to server IP.
- Certificate issued and auto-renewed.
- Marzban accessible over HTTPS, authentication works.
- Users and plans created, configs downloadable.
- Client connections stable with satisfactory speeds.
- Backups configured and tested by restoration on a test server.
- Docker container updates documented.
How to Test
- Check availability:
curl -I https://your_panel_domainreturns HTTP 200 or 302. - Review metrics: monitor user stats before and after downloading 1-2 GB file. Make sure usage tracks properly.
- Reboot test: restart server and confirm services start automatically.
✅ Check: If all these pass, your stack is ready to deliver secure VPN access to users.
15. FAQ
Question: Can I run without Docker?
Answer: Yes, but it complicates updates and portability. Docker speeds up deployment and isolates dependencies.
Question: Which protocol is best for beginners?
Answer: Start with VLESS over TLS using your domain. It’s widely supported, stable, and works well with most clients.
Question: What’s faster — one powerful server or several worldwide?
Answer: For distributed audiences, several servers closer to users reduce latency and improve stability.
Question: How to set different traffic limits?
Answer: Create multiple plans with various quotas and durations in the panel. Assign plans to users during creation or later.
Question: How to roll back after a bad update?
Answer: Use backups of data directories and previous Docker image versions. Always snapshot before updating.
Question: What if client speeds drop in the evening?
Answer: Offer alternative protocols or ports, suggest nodes in different regions, check CPU and network load, and verify routing.
Question: Can I separate the panel and node on different servers?
Answer: Yes. The panel supports managing multiple nodes across countries, which is common for scaling.
Question: Does Marzban support WireGuard and OpenVPN?
Answer: Marzban’s core focuses on the Xray family. WireGuard and OpenVPN can run alongside and be handed out via panel links or instructions as external services.
Question: Is a dedicated IP necessary?
Answer: Recommended. A dedicated IP reduces block risks and provides predictable routing.
Question: What if my domain uses proxy protection from the registrar?
Answer: Disable proxying during certificate issuance. You can re-enable afterward but keep validation details in mind.
16. Conclusion
You’ve completed the full cycle: prepared your server, set up domain and HTTPS, deployed Marzban, created plans and users, tested connections on phone and PC, and introduced basic maintenance with backups and updates. Now you have a manageable VPN service with clear stats and flexible Xray protocol settings. As your load grows, add nodes in needed regions and distribute users for better connection quality.
⚠️ Note: DIY maintenance requires time: regular updates, monitoring, backups, and quick fixes during issues. Expect to spend several hours monthly, and more during major changes.
Expert tip: If you want a personal VPN server without shared resources and a dedicated IP right now, without console hassle, consider vpn.how. They offer WireGuard, OpenVPN, IKEv2, L2TP, SSTP protocols; servers in Moscow, St. Petersburg, Amsterdam, Frankfurt, London, New York, San Jose, Chicago, Singapore, Sydney, Madrid, Helsinki, Stockholm, Warsaw, Copenhagen, and Stavanger. Payment via Russian cards, SBP, USDT, or BTC accepted. Rates start at 490 RUB/day and 2490 RUB/month with discounts for long terms. Servers auto-launch within about 5 minutes after payment, with a no-logs policy. This is ideal for a fast, stable solution without DIY setup and maintenance.
From here, you can advance towards multi-node architecture, deployment automation, billing integration, and improved fault tolerance. Your current foundation is strong enough to step confidently into advanced setups.