Binance dalla Russia nel 2026: operare in sicurezza, KYC, VPN e alternative — guida passo dopo passo
Guida passo dopo passo per principianti: come prepararsi in sicurezza, completare il KYC, valutare i rischi di blocco e scegliere exchange alternativi nel 2026. Analizzeremo VPN, depositi, prelievi, verifica dei risultati, errori tipici e scenari affidabili con attenzione alla legalità.
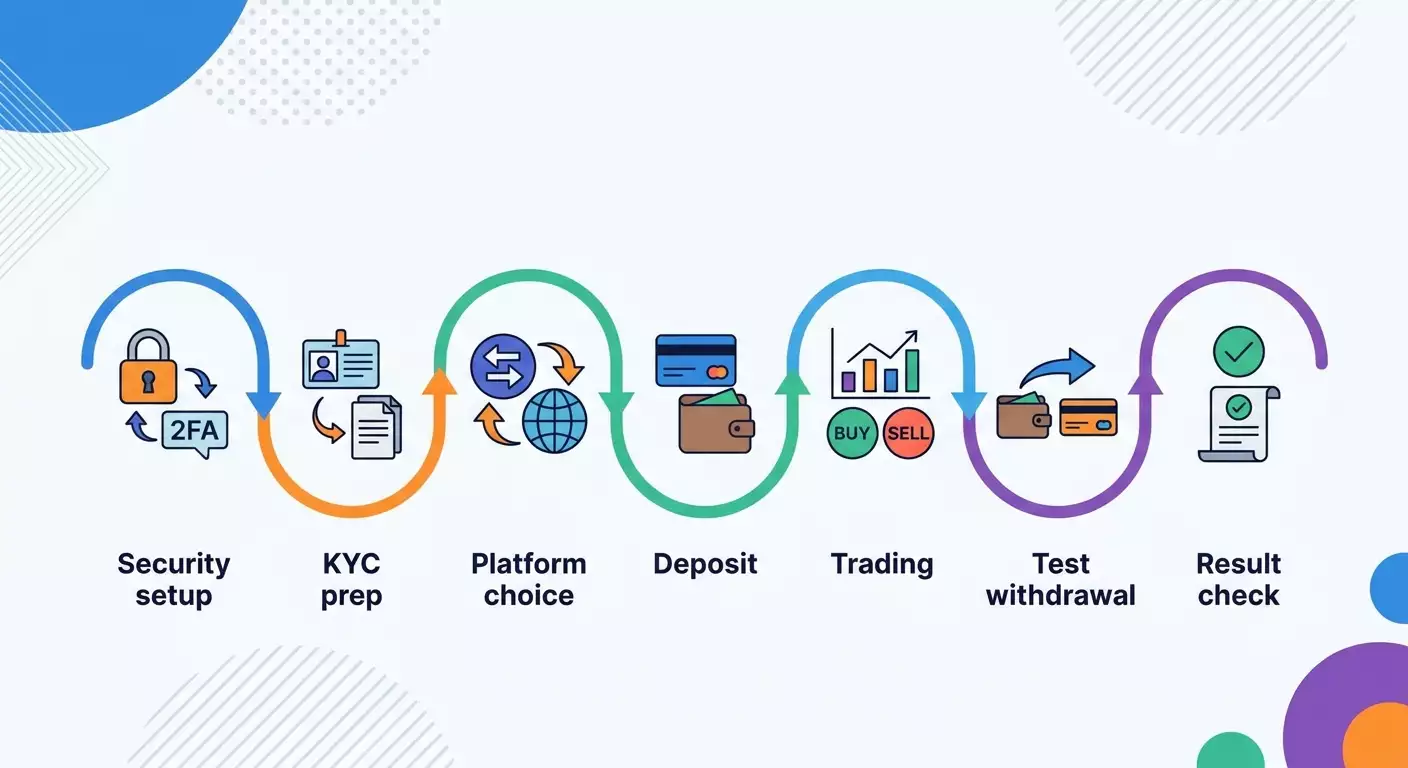
Contenuto dell'articolo
- 1. introduzione
- 2. preparazione preliminare
- 3. concetti base
- 4. passo 1: definire stato legale e rischi
- 5. passo 2: configuriamo ambiente e rete sicuri
- 6. passo 3: prepariamo documenti e dati per kyc
- 7. passo 4: scegliamo strategia: binance o alternative
- 8. passo 5: registrazione e configurazione sicura account
- 9. passo 6: deposito: p2p, deposito crypto e transazioni di prova
- 10. passo 7: trading e gestione rischi
- 11. passo 8: prelievo e verifica stabilità
- 12. verifica finale
- 13. errori tipici e come risolverli
- 14. faq
- Conclusione
1. Introduzione
Hai tra le mani una guida dettagliata, pratica e aggiornata al 2026 che ti aiuterà a lavorare in modo sicuro e legale con gli exchange crypto dalla Russia. Capirai le limitazioni di Binance, il ruolo della VPN, come prepararti al KYC, quali sono i rischi di blocco e come scegliere con saggezza piattaforme alternative. Racchiudiamo tutto in un’unica istruzione chiara e verificabile, dove ogni passo è spiegato con parole semplici, accompagnato dalla logica del "cosa fare" e "perché è importante".
Cosa otterrai alla fine: creerai un ambiente di accesso sicuro, comprenderai i termini base, costruirai una strategia personale per lavorare con exchange e wallet, raccoglierai i documenti per il KYC, registrerai e configurerai correttamente l’account sulla piattaforma scelta, eseguirai un deposito di prova e un prelievo sicuro di una piccola somma, quindi verificherai il risultato con una checklist. Nel frattempo, imparerai dagli errori più comuni ed eviterai trappole.
Per chi è questa guida: principianti che vogliono agire con cautela e senza rischi inutili, e anche utenti con esperienza base nel mondo crypto che vogliono sistematizzare il processo. Il testo include anche sezioni avanzate per chi punta a una maggiore sicurezza e robustezza.
Cosa sapere fin da subito: non incoraggiamo né spieghiamo come aggirare sanzioni, regole delle piattaforme o leggi. Prenderai decisioni consapevoli nel rispetto della legalità e dei termini di servizio. Spieghiamo come valutare i rischi e agire correttamente secondo le regole degli exchange e le normative della tua giurisdizione.
Quanto tempo serve: la configurazione base dell’ambiente sicuro e la raccolta documenti richiedono da 60 a 120 minuti. La registrazione e la prima configurazione dell’account da 20 a 40 minuti. La verifica KYC, se necessaria, può durare da 10 minuti fino a 48 ore. Deposito di prova e prelievo richiedono 15–30 minuti, considerando le conferme di rete. Per affrontare tutta la guida con calma prevedi 3–5 ore.
2. Preparazione preliminare
Prima di procedere con i passi, prepara gli strumenti e l’ambiente di lavoro. Questo ridurrà il rischio di errori e velocizzerà il processo.
Strumenti e accessi necessari
- Computer o laptop con sistema operativo aggiornato (Windows, macOS o Linux) oppure smartphone moderno.
- Connessione internet stabile con almeno 10 Mbps per l’identificazione video.
- Un’email separata per le operazioni crypto (consigliata), accesso al telefono per SMS o app di autenticazione.
- App autenticatore (ad esempio Authy o Google Authenticator) per il 2FA.
- Gestore di password per custodire in sicurezza le credenziali.
- Wallet non custodial (ad esempio mobile o desktop) per la custodia autonoma, se serve. Wallet hardware opzionale.
- Documenti per KYC (passaporto, patente di guida, eventualmente prova di indirizzo — bolletta o estratto conto bancario).
Requisiti di sistema
- Browser aggiornato (Chrome, Firefox, Safari, Edge). Disabilita eventuali estensioni sospette.
- Spazio libero sufficiente per installare app per wallet e gestore password.
- Camera e microfono per l’identificazione video (se richiesta).
Cosa scaricare e installare
- Gestore password. Crea un archivio dedicato “Crypto”.
- App per 2FA.
- App ufficiale mobile dell’exchange scelto (se pensi di usare lo smartphone).
- Wallet non custodial e, se vuoi, software per wallet hardware.
Backup
- Annota le frasi seed dei wallet su carta e conservale in un luogo sicuro.
- Salva i codici di backup del 2FA su carta e nel gestore password (come nota crittografata).
- Fai copia dei documenti KYC in un archivio criptato (password forte), se prevedi di caricarli su più piattaforme.
Consiglio: nomina i file con cura, ad esempio “Passport_IvanIvanov_2026-05.jpg”. Facilita caricamenti ripetuti e controlli.
3. Concetti base
Termini chiave spiegati semplice
- KYC — verifica dell’identità sull’exchange. Confermi che sei chi dichiari di essere.
- AML — misure anti-riciclaggio. Gli exchange analizzano fonti di fondi e comportamenti.
- VPN — canale criptato tra il tuo dispositivo e il server del provider. Protegge il traffico, ma non rende legali azioni illegali.
- Geoblocco — restrizione di accesso a un servizio per paese o IP.
- Exchange centralizzato (CEX) — servizio con account, KYC e custodia fondi sui conti dell’exchange.
- DEX — exchange decentralizzato senza account; scambi diretti dal tuo wallet.
- P2P — scambio tra persone tramite piattaforma escrow con feedback e garanzia.
- Custodial — qualcuno custodisce i tuoi token per te.
- Non custodial — custodisci tu stesso le chiavi e ne sei responsabile.
- Stablecoin — token ancorati a valute fiat (es. USDT).
Principi fondamentali
- Legalità e rispetto delle regole delle piattaforme sono la base. Tutti i tuoi passi devono restare in questi limiti.
- Separa wallet per trading e wallet “freddi”. Minimizza fondi sugli exchange.
- Piccole transazioni di prova sono il metodo migliore per verificare nuove configurazioni.
- La sicurezza è un processo: password, 2FA, whitelist, backup, logging delle attività.
Cosa è importante sapere prima di iniziare
Dal 2026 alcune piattaforme centralizzate limitano servizi per residenti di certi paesi. Le politiche cambiano. Il tuo compito è leggere i rischi, agire dentro le regole e adottare piani alternativi quando serve: CEX legali, P2P con escrow o DEX. La VPN serve per criptare e stabilizzare l’accesso, non per violare i blocchi geografici. Da come prepari ambiente e documenti dipende la tranquillità nel lavorare senza paura di blocchi.
4. Passo 1: Definire stato legale e rischi
Obiettivo
Costruire un quadro chiaro: cosa è permesso a te, quali limitazioni ha ogni piattaforma (inclusa Binance) e quali scenari sono possibili.
Istruzioni passo passo
- Determina il tuo status fiscale e di residenza. Se sei residente fiscale in Russia, annotalo nelle tue note.
- Apri termini d’uso e sezioni paesi supportati delle piattaforme scelte. Se manca chiarezza, cerca riferimenti a “giurisdizioni limitate” e “sanzioni” nelle FAQ interne.
- Prendi nota dei servizi disponibili per residenti del tuo paese: registrazione, KYC, deposito, trading, prelievo, P2P.
- Per Binance controlla lo status attuale per residenti russi direttamente nell’account di supporto o nelle news della piattaforma. Attenzione a limitazioni come limiti, asset, reti consentite, trasferimenti tra account.
- Crea una tabella dei rischi: “Piattaforma”, “Accesso KYC”, “Deposito/Prelievo”, “Limiti”, “Probabilità blocchi”, “Supporto clienti”.
- Valuta alternative: CEX accessibili, piattaforme P2P con forte moderazione, DEX su reti affidabili. Riporta in tabella pregi e difetti.
⚠️ Attenzione: evita di cercare di aggirare le restrizioni o falsificare info nel KYC. Può causare blocchi, perdite finanziarie e problemi legali.
Consiglio: pianifica più scenari: se oggi Binance è disponibile, tieni pronto un percorso P2P o DEX per flessibilità.
Risultato atteso
Hai una tabella dei rischi e sai se e come usare Binance o altre piattaforme, più alternative valide.
Problemi e soluzioni comuni
- Info scarse sul sito → Contatta supporto via chat integrata, chiedi dettagli sulla tua giurisdizione e salva la conversazione.
- Dubbio sullo status fiscale → Consulta un legale specializzato o documenti ufficiali dei regolatori.
✅ Check: puoi rispondere chiaramente a due domande: “Posso usare questa piattaforma?” e “Qual è il piano B se cambia qualcosa?”.
5. Passo 2: Configuriamo ambiente e rete sicuri
Obiettivo
Creare un ambiente protetto: email separata, password robuste, autenticazione a due fattori, profilo browser sicuro e protezione di rete corretta. Riduce rischio di attacchi e perdite involontarie.
Istruzioni passo passo
- Crea un’email dedicata per operazioni crypto. Imposta una password unica di 16–24 caratteri con simboli, numeri e lettere maiuscole/minuscole.
- Nel gestore password crea un archivio “Crypto”. Aggiungi dati della nuova email. Attiva sincronizzazione cloud criptata.
- Installa app autenticatore. Collegala all’email e attiva codici di backup. Salvali su carta e gestore password.
- Crea un profilo browser separato chiamato “Crypto”. Disattiva estensioni sospette. Attiva avvisi phishing nelle impostazioni di sicurezza.
- Abilita blocco automatico schermo su PC e telefono. Aggiorna sistema operativo e browser in modo automatico.
- Configura protezione di rete. Se usi VPN, scegli provider trasparente, con protocolli affidabili e IP dedicato. Serve per sicurezza in reti pubbliche e stabilità sessioni.
Consiglio: connetti a Wi-Fi pubblici solo via canale criptato e evita operazioni con somme grandi.
Segnaliamo una soluzione pratica per chi vuole stabilità e IP prevedibile: vpn.how offre VPN personali con IP dedicato (non condiviso), supporta WireGuard, OpenVPN, IKEv2, L2TP, SSTP per adeguarsi a dispositivi e necessità. Server a Mosca, San Pietroburgo, Amsterdam, Francoforte, Londra, New York, San Jose, Chicago, Singapore, Sydney, Madrid, Helsinki, Stoccolma, Varsavia, Copenaghen e Stavanger. Pagamenti con carte russe (incluse Tinkoff e Ozon Card), tramite SBP e in USDT/BTC; per noleggiare VPN non serve carta estera. Tariffe da 490 ₽ al giorno e 2490 ₽ al mese con sconti per abbonamenti lunghi. Server attivato in circa 5 minuti, no-log policy. Ideale se vuoi un IP personale e stabile per sessioni sicure senza infrangere regole.
⚠️ Attenzione: usare VPN non legalizza ciò che è vietato da piattaforme o legge. Non usare VPN per ingannare su giurisdizione o identità.
Risultato atteso
Hai email, gestore password, 2FA, profilo browser “Crypto” e configurazione di rete sicura.
Problemi e soluzioni
- Mail di verifica non arrivano → Controlla spam, inserisci mittente in whitelist, chiedi nuovo invio.
- Codici 2FA non funzionano → Sincronizza orologio dispositivo e verifica fuso orario.
- VPN rallenta → Prova protocollo diverso (es. WireGuard) o server più vicino geograficamente.
✅ Check: accedi a email e servizio test con 2FA attivo, ricevi codici, profilo browser “Crypto” è pulito e stabile.
6. Passo 3: Prepariamo documenti e dati per KYC
Obiettivo
Raccogliere un pacchetto valido per la verifica identità sulla piattaforma scelta e superarla al primo tentativo.
Istruzioni passo passo
- Prepara documenti: passaporto internazionale o nazionale, patente di guida. Controlla scadenze.
- Prova di indirizzo: bolletta utenze, estratto conto o documento ufficiale con nome e indirizzo. Meglio recente (1–3 mesi).
- Scatta foto di qualità: dritte, senza riflessi, completamente leggibili. Evita angoli tagliati e ombre.
- Preparati per video-identificazione: ambiente silenzioso, buona luce, niente filtri. Segui indicazioni sullo schermo.
- Annota dati personali da fornire: nome e cognome in latino e cirillico, data di nascita, cittadinanza, indirizzo, numero di telefono.
- Crea archivio criptato con copie documenti, imposta password forte. Salvala nel gestore password.
⚠️ Attenzione: non fornire documenti falsi o alterati. Qualsiasi tentativo di frode porterà al blocco definitivo e possibili conseguenze legali.
Consiglio: prima di caricare ogni file, aprilo e controlla che tutti i campi siano leggibili. In caso di dubbi, rifai la foto in luogo più luminoso.
Risultato atteso
Hai un set valido e ordinato di documenti KYC, pronto per il caricamento.
Problemi e soluzioni comuni
- File troppo pesanti → Comprimili senza perdita o fotografa con risoluzione più bassa ma leggibile.
- Richiesta documento extra → Aggiungi con calma rispettando tempi e qualità richiesti.
✅ Check: trovi e carichi qualsiasi documento in 5 minuti senza difficoltà.
7. Passo 4: Scegliamo strategia: Binance o alternative
Obiettivo
Scegliere un modo legale e sostenibile di lavorare: Binance se permesso, oppure alternative CEX, P2P, DEX con rischi chiari.
Istruzioni passo passo
- Controlla lo status di Binance per la tua giurisdizione dal centro assistenza interno. Annota quali funzioni sono disponibili o limitate.
- Prepara una lista di alternative: 2–3 CEX affidabili, 1–2 piattaforme P2P con escrow e moderazione, 1–2 DEX su reti robuste (basse commissioni e alta liquidità).
- Valuta ogni piattaforma su KYC richiesto, limiti, commissioni deposito e prelievo, reti supportate, qualità supporto, frequenza incidenti di sicurezza, trasparenza (es. report riserve).
- Comparara scenari: se non fai trading attivo, P2P e DEX possono bastarti senza complicazioni.
- Scegli una piattaforma “principale” e una “di riserva”. Per la riserva prepara accessi e documenti analoghi.
Consiglio: crea una nota “Scenari”: “Principale: CEX-A, Riserva: P2P-B, Emergenza: DEX-C con bridge a rete X”. Facilita il passaggio in caso di problemi.
Risultato atteso
Hai un piano chiaro: quale piattaforma usare e perché, piattaforma di backup e come agire se cambiano le condizioni.
Problemi e soluzioni
- Commissioni poco chiare → Controlla calcolatori e recensioni per costi attuali di rete e piattaforma.
- Difficoltà a valutare rischi blocchi → Consulta news e report pubblici; tieni sempre un’alternativa pronta.
✅ Check: spieghi a un amico in 30 secondi la tua strategia di deposito e prelievo principale e di riserva.
8. Passo 5: Registrazione e configurazione sicura account
Obiettivo
Creare un account sulla piattaforma con le funzioni di sicurezza essenziali attivate.
Istruzioni passo passo
- Vai alla registrazione sulla piattaforma scelta. Inserisci email e crea password forte (diversa da quella dell’email).
- Conferma mail con codice. Controlla spam se non ricevi.
- Nelle impostazioni di sicurezza attiva 2FA tramite app autenticatore. Salva codici di backup.
- Configura codice anti-phishing che comparirà nelle email, assicurando l’autenticità.
- Attiva notifiche per accessi, prelievi e modifiche via mail e app.
- Abilita whitelist per indirizzi di prelievo (se disponibile). Aggiungi il tuo wallet personale e verifica tempi di attivazione.
- Disabilita funzioni API inutili. Se usi API per bot, limita chiavi a permessi di sola lettura, senza autorizzazione prelievo.
- Annota in gestore password login, password, codici di backup, note su whitelist e anti-phishing.
Consiglio: crea un segnale o frase mnemonica per riconoscere siti phishing: ad esempio, usa sempre il bookmark per entrare, non la ricerca.
Nota su Binance: per residenti russi nel 2026 potrebbero esserci restrizioni speciali. Non falsificare paese o status. Se funzionalità mancano, usa un piano di riserva preparato (CEX alternativo o P2P), rispettando sempre regole specifiche.
Risultato atteso
Account creato, protezione attiva, whitelist configurata, dati importanti salvati ordinatamente.
Problemi e soluzioni
- 2FA non si collega → Verifica sincronizzazione orario dispositivo e prova altro scanner QR.
- Email non arrivano → Inserisci dominio piattaforma in whitelist.
- Non si può aggiungere indirizzo a whitelist → Controlla requisiti: spesso serve ulteriore 2FA e attesa 24 ore.
✅ Check: all’accesso l’exchange richiede 2FA e ricevi mail di login con codice anti-phishing.
9. Passo 6: Deposito: P2P, deposito crypto e transazioni di prova
Obiettivo
Ricaricare saldo in modo sicuro e prevedibile, verificando con una piccola somma.
Istruzioni passo passo
- Scegli metodo deposito: crypto da altro exchange o wallet (USDT/USDC/BTC/ETH), P2P con escrow, metodi bancari se legalmente disponibili per te e la piattaforma.
- Per deposito crypto: vai in “Wallet — Deposito”, scegli coin e rete (es. USDT su rete TRON TRC20 o altra rete supportata da entrambi).
- Copia indirizzo deposito. Controlla primi e ultimi 4 caratteri. Sull’invio incolla indirizzo e verifica che la rete corrisponda su entrambi i lati.
- Invia somma di prova (es. equivalente 5–20 USD). Attendi conferme di rete. Verifica accredito nella cronologia depositi.
- Per P2P: scegli venditore con alta reputazione, tante transazioni e verifica identità. Controlla limiti e metodi pagamento accettati.
- Crea ordine P2P e segui indicazioni escrow. Paga solo secondo le regole dello scambio. Carica prova pagamento e aspetta rilascio token.
- Dopo accredito, fai screenshot di controlli: indirizzo, rete, hash transazione (TXID), orario e ammontare. Salva nelle note.
⚠️ Attenzione: inviare coin sulla rete sbagliata di solito comporta perdita totale. Controlla 3 volte rete e indirizzo prima di confermare.
Consiglio: tieni un piccolo checklist deposito: “Coin — Rete — Indirizzo — Somma — Commissione — TXID”. Segna ogni punto in ordine.
Risultato atteso
Piccola somma accreditata sulla piattaforma. Documenti tutti i dettagli della transazione.
Problemi e soluzioni
- Deposito non arriva → Controlla stato su explorer blockchain con TXID. Se rete lenta aspetta. Se errore contatta supporto con dati.
- Fondoi bloccati in P2P → Apri disputa escrow, fornisci prova pagamento, segui moderator.
✅ Check: vedi somma di prova nel saldo exchange e sai indicare TXID e rete in 10 secondi.
10. Passo 7: Trading e gestione rischi
Obiettivo
Eseguire operazioni con attenzione, consapevole di commissioni e rischi, preservando capitale.
Istruzioni passo passo
- Apri sezione “Spot”. Trova coppia, per esempio USDT/BTC o USDT/ETH, in base al tuo obiettivo.
- Configura interfaccia: mostra commissioni e libro ordini. Controlla regime “maker/taker” e impatto su costo.
- Scegli tipo ordine. Per principianti usa “Limit”: imposti prezzo e quantità.
- Verifica totale, commissioni, saldo disponibile. Clicca “Compra” o “Vendi”.
- Attendi esecuzione ordine e conferma che asset compaiano in “Wallet — Spot”.
- Annota data, coppia, prezzo, commissione, motivo dell’operazione (la disciplina evita operazioni inutili).
Consiglio: evita leva e futures finché non padroneggeri lo spot. Alto rischio liquidazione per inesperti.
Risultato atteso
Hai effettuato uno o due trade di prova e sai dove vedere commissioni e storico operazioni.
Problemi e soluzioni
- Ordine non eseguito → Controlla se il prezzo limite è troppo lontano dal mercato. Avvicinalo o usa ordine mercato.
- Commissione più alta del previsto → Controlla tabella commissioni. Forse la coppia ha tariffe particolari o non hai sconti per il livello account.
✅ Check: sai mostrare a un amico dove leggere storici trade, commissioni e saldo per ogni coin.
11. Passo 8: Prelievo e verifica stabilità
Obiettivo
Verificare di poter prelevare velocemente e in sicurezza, e che tutto il percorso di controllo funzioni.
Istruzioni passo passo
- Apri “Wallet — Prelievo”. Scegli coin e rete corrispondente al wallet che riceve.
- Scegli indirizzo dalla whitelist. Se non presente, aggiungilo e supera attivazione ritardata (spesso 24 ore).
- Inserisci somma modesta lasciando margine per commissioni rete. Controlla totale netto ricevuto.
- Conferma con 2FA, email e se serve SMS.
- Copia TXID dopo invio. Monitora stato su blockchain explorer. Attendi conferme richieste.
- Verifica che coin siano arrivati nel wallet non custodial. Registra nei log dati di rete, TXID, orario, somma, commissione.
Consiglio: tieni sugli exchange solo quanto serve per operazioni imminenti. Il grosso tienilo nel wallet personale.
Risultato atteso
Prelievo di prova completato con successo, confermando percorso sicuro exchange — wallet.
Problemi e soluzioni
- Prelievo bloccato in elaborazione → Potrebbero esserci controlli interni. Contatta supporto, fornisci dati e aspetta risposta.
- Fondos insufficienti per commissione → Ricarica saldo coin per fee (es. ETH per rete Ethereum) e riprova.
✅ Check: vedi somma prelevata nel wallet e riesci a mostrare TXID su explorer blockchain.
12. Verifica finale
Checklist: cosa deve funzionare
- Email separata, gestore password, 2FA attivi e testati.
- Codice anti-phishing abilitato, mail con codice ricevute correttamente.
- Whitelist indirizzi configurata e attivata.
- Deposito prova completato con TXID salvato.
- Una o due operazioni di trading fatte, commissioni chiare.
- Prelievo prova riuscito, fondi nel wallet personale.
- Piano B definito e chiaro.
Come testare
- Accedi da nuovo dispositivo e verifica che senza 2FA non si entra.
- Effettua una transazione piccola per ripetere e confermare processo.
- Attiva logging: annota data, attività e risultato per monitorare progressi.
Segnali di successo
- Nessun errore rete o indirizzo errato in depositi e prelievi.
- Documenti e codici backup trovati velocemente.
- Comprensione chiara di commissioni, limiti e reti disponibili.
Consiglio: una volta al mese fai un “test di emergenza”: verifica di poter prelevare rapidamente e avere tutti accessi a portata di mano.
13. Errori tipici e come risolverli
- Problema: invio coin sulla rete sbagliata. Causa: non confrontare rete mittente e destinatario. Soluzione: verifica sempre rete e indirizzo, fai una prova con piccola somma.
- Problema: perdita accesso 2FA. Causa: mancati o persi codici backup. Soluzione: stampa codici in anticipo, conservali separati; in caso di perdita contatta supporto ma recupero può essere lungo.
- Problema: sito phishing ha rubato credenziali. Causa: clic su link da mail o ricerca. Soluzione: accedi solo da bookmark, verifica dominio e codice anti-phishing.
- Problema: account bloccato per regole violate. Causa: tentativo di bypassare geoblocchi o falsificare KYC. Soluzione: rispetta sempre regole, evita bypass illegali, prepara piani alternativi.
- Problema: ritardi KYC. Causa: scansioni scadenti o indirizzo non corrispondente. Soluzione: ricarica documenti in alta qualità, fornisci prova indirizzo recente.
- Problema: commissioni inattese e saldo netto basso. Causa: ignorare fee di rete e piattaforma. Soluzione: studia tabelle commissioni, aggiungi margine rete, usa coppie con costi inferiori.
- Problema: trading impulsivo per panico. Causa: mancanza di piano. Soluzione: definisci strategia di entrata/uscita e limiti di rischio, annota motivazioni per ogni trade.
Consiglio: crea un tuo “catalogo errori”: annota sbagli tuoi o conoscenti e rileggi regolarmente.
14. FAQ
Domande frequenti
- Posso usare VPN per lavorare con exchange dalla Russia? Risposta: la VPN è uno strumento per criptare e stabilizzare connessione. Non deve essere usata per violare norme delle piattaforme o leggi. Usala per sicurezza, non per mascherare giurisdizione.
- Cosa fare se KYC viene rifiutato? Risposta: verifica qualità documenti e corrispondenza indirizzo. Carica documento aggiornato e riprova. Se serve, contatta supporto.
- Qual è il metodo di deposito più sicuro: P2P o crypto deposit? Risposta: più sicuro è quello che sai gestire operativamente. Deposito crypto con somma di prova e rete corretta è prevedibile. P2P è affidabile scegliendo venditori verificati e seguendo regole escrow.
- Conviene lasciare fondi sugli exchange? Risposta: tieni solo l’importo necessario per operazioni imminenti. Il capitale principale è meglio conservarlo su wallet personali con backup sicuri.
- Come capire quali alternative sono disponibili? Risposta: usa checklist di valutazione: KYC, limiti, commissioni, reti, reputazione, supporto, trasparenza. Tieni sempre un piano B scritto.
- Cosa fare se cambiano le condizioni della piattaforma? Risposta: attiva il piano di riserva preparato: CEX alternativo, P2P o DEX. Esegui operazioni di prova sul nuovo percorso.
- Come ridurre il rischio phishing? Risposta: usa bookmark, codice anti-phishing, 2FA, evita login da link in mail o social.
- Serve un wallet hardware per principianti? Risposta: non obbligatorio, ma utile se gestisci importi rilevanti. Migliora la sicurezza offline.
- Come gestire le tasse? Risposta: registra tutte le operazioni in un log. Consulta un esperto fiscale nella tua giurisdizione e rispetta la legge.
- Quanto tempo occupa un prelievo? Risposta: dipende da rete e controlli interni piattaforma. Generalmente da pochi minuti a un’ora, più a lungo se ci sono verifiche.
Conclusione
Hai completato tutto il percorso: valutato stato legale e rischi, preparato ambiente sicuro (email, password, 2FA, profilo browser, protezione rete), raccolto documenti KYC, scelto strategia operativa (Binance se legale o alternative), configurato account, fatto deposito e prelievo prova, controllato risultati con checklist. Hai imparato a riconoscere i punti critici: dove si commettono più errori, come evitare phishing e come reagire a cambiamenti di regole.
Passi successivi: mantieni l’igiene della sicurezza, aggiorna il piano B e fai periodicamente transazioni di prova con piccole somme. Allena la disciplina: annota motivazioni di trade e gestisci rischi. Se in futuro incrementi capitali, considera wallet hardware, whitelist indirizzi e, se serve, IP dedicato per sessioni stabili — sempre nel rispetto delle regole dei servizi usati.
Dove migliorare: studia DEX, bridge cross-chain e dinamiche commissioni, sperimenta automazioni sicure via API “read-only”. Rafforza competenze legali: segui notizie regolatori, aggiorna pratiche conformità. Ricorda: il miglior investimento è nella sicurezza dei tuoi processi e nella capacità di agire legalmente, con cura e prevedibilità.