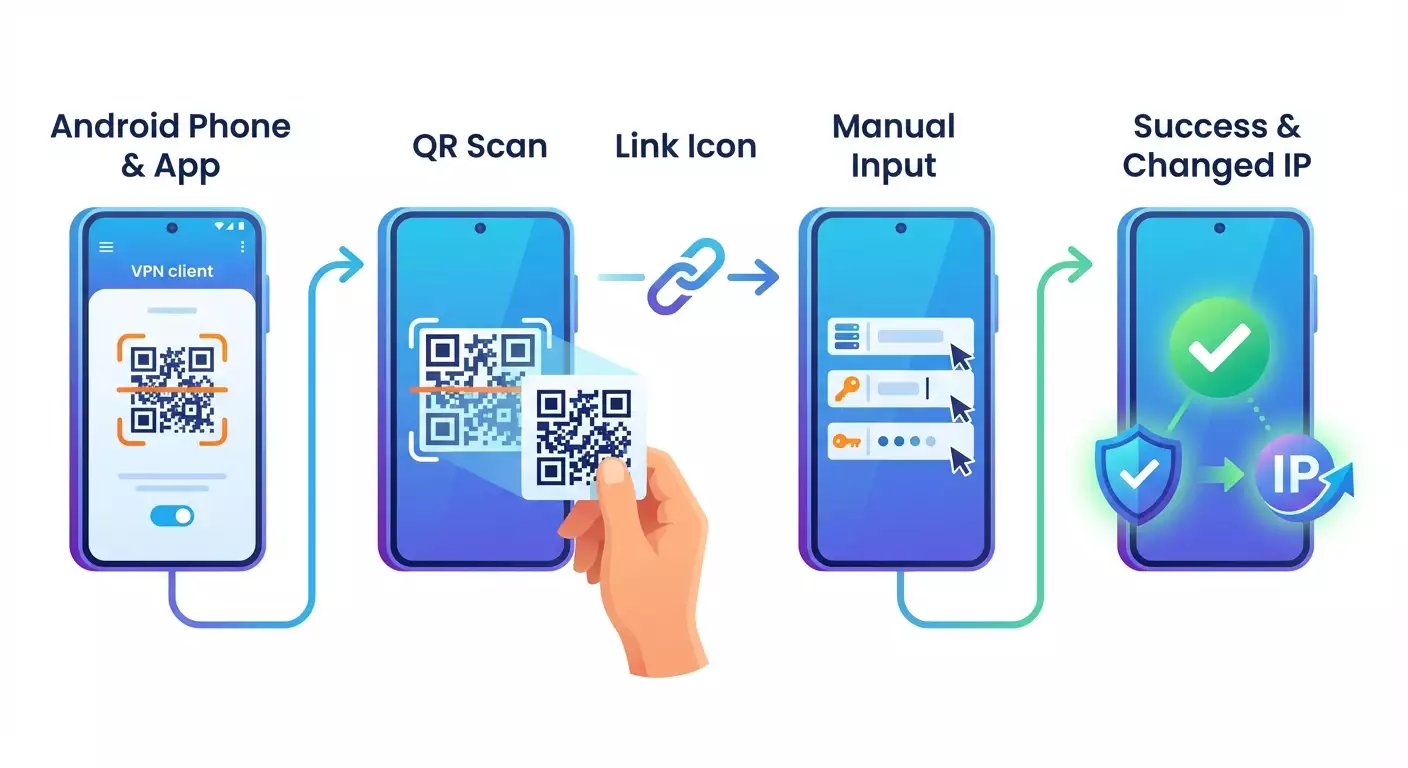
Setting up VLESS+Reality for Android
Content of the article
- Introduction
- Pre-setup preparation
- Basic concepts
- Step 1: prepare your profile in vpn.how personal account
- Step 2: install and prepare v2rayng
- Step 3: method 1 — import via qr code (the easiest way)
- Step 4: method 2 — import via vless:// link
- Step 5: method 3 — manual vless+reality profile setup
- Step 6: connecting and verifying your new ip
- Verifying the result
- Common issues and fixes
- Extra features
- Faq
- Conclusion
Introduction
This step-by-step guide walks you through setting up VLESS+Reality for Android using the vpn.how service. You’ll install the v2rayNG client, import your profile through three methods (QR code, vless:// link, and manual entry), connect, and verify your new IP address. We’ll cover each step in detail, share helpful tips, and point out common mistakes so you get it right the first time.
Who this guide is for: beginners and advanced Android users looking for a simple and reliable VLESS+Reality setup based on data from the vpn.how personal account.
What you need to know beforehand: basic Android skills, access to your vpn.how personal account, and the ability to install apps from Google Play or APK files. No special technical knowledge is required—we explain everything in plain language.
Estimated time: typically 15–25 minutes to install the client and verify the connection. If setting up manually, allocate an extra 5–10 minutes to carefully enter parameters.
Tip: Keep your vpn.how personal account open during setup. It contains all connection details: server address, port, UUID, Flow (xtls-rprx-vision), Security: Reality, SNI, Fingerprint (chrome), Public Key, and Short ID.
Pre-setup Preparation
Before you start, make sure you have everything you need and your device meets the requirements. This will save you unnecessary steps and prevent errors later.
Required tools, apps, and access
- A vpn.how account with an active VPN server and a VLESS+Reality profile.
- An Android smartphone or tablet (Android 8.0 or newer recommended; minimum Android 7).
- Internet access (Wi-Fi or mobile data) and ability to open your vpn.how personal account.
- The v2rayNG app from Google Play or official APK from the project’s site.
System requirements
- Android 7.0 or newer (Android 10+ recommended for better stability).
- 50–100 MB of free space for installing and running the client.
- A stable internet connection without captive portals (Wi-Fi portal login pages).
What to download, install, and configure
- Install v2rayNG (preferably from Google Play; use APK if Play Store is unavailable).
- Open your vpn.how personal account and navigate to the VLESS+Reality profile section: you’ll find a QR code, vless:// link, and all parameters for manual setup.
⚠️ Warning: If installing via APK, enable installation from unknown sources only during the installation process and download the APK from a trusted source. Then revert security settings afterward.
Backups (if relevant)
If you already have profiles in v2rayNG, you can export your current configurations to a file before adding new ones. This helps you easily roll back if needed.
✅ Checklist: You have access to vpn.how, your device meets the requirements, and v2rayNG is installed or ready to install.
Basic Concepts
Before we begin, let’s briefly cover some terms so you understand what you’re configuring and why.
- VLESS — a modern, lightweight proxy protocol without default stream-level encryption, usually paired with protective layers like TLS or Reality. It's reliable, fast, and widely supported by clients.
- Reality — a traffic obfuscation technology that doesn't use traditional TLS certificates but relies on the server's public key and parameters like SNI, Fingerprint, and Short ID. Unlike TLS, it doesn’t need a real domain certificate but looks like legitimate traffic.
- UUID — your unique profile identifier. Never guess it; always copy it exactly from your vpn.how account.
- Flow: xtls-rprx-vision — the recommended VLESS+Reality transmission mode for modern clients, ensuring stability and performance.
- SNI — the domain name mimicked during connection setup, provided in your vpn.how account and must be entered accurately.
- Public Key (Reality server public key) — the server’s encryption key used to establish the Reality session. Copy it exactly in full.
- Short ID — a short identifier for your specific Reality route/profile. Enter it exactly as shown in vpn.how.
- Fingerprint — a browser fingerprint imitation (e.g., chrome) for better traffic legitimacy.
The key thing to remember: get all parameters straight from your vpn.how personal account. Don’t invent anything—otherwise, the connection won’t work.
✅ Checklist: You understand what you’re entering and why: server address, port, UUID, Flow, SNI, Fingerprint, Public Key, and Short ID are all from vpn.how.
Step 1: Prepare Your Profile in vpn.how Personal Account
Goal
Obtain ready-to-use connection details: QR code, vless:// link, and manual configuration parameters for VLESS+Reality.
Step-by-step
- Open a browser on your Android device and log into your vpn.how personal account.
- Navigate to your VPN server or connections profile section.
- Find and open the “VLESS+Reality” entry.
- Confirm that you see the QR code and vless:// link. Below, you should see a table with parameters: server address, port, UUID, Flow (xtls-rprx-vision), Security: Reality, SNI, Fingerprint (chrome), Public Key, Short ID.
- Keep this page open; you’ll need it for importing or manual parameter entry.
Tip: Take a screenshot of the parameters (not the QR code) for quick offline reference. Store it securely since it contains private data.
⚠️ Warning: Never share your QR code, vless:// link, or parameters with anyone. Anyone with these can use your traffic.
✅ Checklist: The “VLESS+Reality” section is open in vpn.how, showing the QR code, vless:// link, and all connection parameters.
Possible problems and solutions
- QR code missing — refresh the page or expand the “VLESS+Reality” section.
- No active server — create a server in vpn.how and wait until it shows “Active” status.
- Can't log in — verify your username/password or recover access.
Step 2: Install and Prepare v2rayNG
Goal
Install the latest v2rayNG version on Android and get it ready to import your profile.
Step-by-step
- Open Google Play on your Android device.
- Search for “v2rayNG” and open the app page from a trusted developer.
- Tap “Install” and wait for the installation to complete.
- Open v2rayNG. On first launch, grant the requested permissions.
- If Google Play is unavailable: download the v2rayNG APK from the official project page. Enable “install from unknown sources,” install the APK, then revert the security setting.
Tip: Set a screen lock (PIN/biometrics) to protect profile settings inside the app.
⚠️ Warning: Never download APKs from unknown sites. Use official sources and verify the app signature.
✅ Checklist: v2rayNG is installed and launches without errors. The “+” button to add profiles is visible on the main screen.
Possible problems and solutions
- Can’t install from Play — clear Play Store cache and retry.
- APK won’t open — enable installation from unknown sources in security settings.
- Antivirus alarms — verify APK source authenticity and digital signature.
Step 3: Method 1 — Import via QR Code (the easiest way)
Goal
Quickly import your VLESS+Reality profile from vpn.how with a single tap.
Step-by-step
- Open v2rayNG on Android.
- Tap the “+” button in the top-right corner.
- Select “Scan QR code.”
- Allow camera access if prompted.
- Point your camera at the QR code from the vpn.how “VLESS+Reality” section.
- Confirm profile import if requested.
- If needed, open the profile to verify fields are filled: server address, port, UUID, Flow: xtls-rprx-vision, Security: Reality, SNI, Fingerprint: chrome, Public Key, Short ID.
- Save changes if you opened the profile for checking.
Tip: If the QR doesn’t scan well on one screen, increase brightness or zoom in on the image. You can also display the QR on a second device.
✅ Checklist: A new profile named after your vpn.how server is in the profile list. It’s selected by default or available to pick.
Possible problems and solutions
- QR not recognized — clean the camera lens, enlarge the QR, or use a well-lit environment.
- Import error — reload the QR page or try importing using the vless:// link (next step).
- Fields empty — ensure you scanned the QR from the vpn.how “VLESS+Reality” section.
Step 4: Method 2 — Import via vless:// Link
Goal
Import your VLESS+Reality profile without a camera, directly from the clipboard.
Step-by-step
- In your vpn.how account, open the “VLESS+Reality” section.
- Tap “Copy” next to the vless:// link to copy it to your clipboard.
- Switch to the v2rayNG app.
- Tap the “+” button in the top-right corner.
- Select “Import from clipboard.” The app will detect the vless:// link automatically.
- Confirm the import. The new profile will appear in your list.
- Open the profile to quickly verify fields: server address, port, UUID, Flow: xtls-rprx-vision, Security: Reality, SNI, Fingerprint: chrome, Public Key, Short ID.
- Save and close the profile.
Tip: If multiple vless:// links are in your clipboard, clear it and copy only the one from vpn.how to avoid importing the wrong profile.
✅ Checklist: The new profile is added, selected, and contains correct parameters from vpn.how.
Possible problems and solutions
- “Import from clipboard” button disabled — make sure the vless:// link is actually copied.
- Old profile imports — copy the link fresh and retry import.
- Profile won’t connect — confirm that Flow and Security match Reality and xtls-rprx-vision.
Step 5: Method 3 — Manual VLESS+Reality Profile Setup
Goal
Create the profile manually if QR or link import isn’t possible or you want full control over every field.
Step-by-step
- Open v2rayNG.
- Tap the “+” button in the top-right corner.
- Choose “Add profile manually” or “Manual,” then select “VLESS” as the profile type.
- The profile form will open. Enter the Server Address exactly as shown in vpn.how (e.g., example.com or IP address).
- Enter the Port exactly from vpn.how (e.g., 443 or the specified port).
- Paste the ID (UUID) from vpn.how, ensuring no spaces before or after.
- Check the Encryption setting for VLESS and set it to “none” (or leave default if specified by the client).
- Find the Flow field and set it to “xtls-rprx-vision” exactly as in vpn.how.
- In the transport settings, choose “TCP” (or leave default if VLESS+Reality implies TCP).
- Open the Security or TLS/Reality section and set it to Reality.
- In the SNI/Server Name field, enter the domain name from vpn.how (e.g., the mimic domain). Important: no http/https prefix, only the domain name.
- For Fingerprint, select or type “chrome” as indicated in vpn.how.
- Paste the full Public Key for Reality from vpn.how, ensuring no line breaks or extra characters.
- Enter the Short ID exactly from vpn.how, respecting letter case; usually a hexadecimal string.
- Optionally, if there’s a Spider X field (sometimes required empty or with a specific value), leave it empty or enter as specified in vpn.how.
- Save the profile by tapping “OK” or the “Save” icon.
- Make sure the new profile is selected as active (check it or tap on it).
Tip: Fill fields one by one, double-checking against vpn.how after each entry. This helps prevent typos that cause connection failures.
✅ Checklist: Profile saved with server address, port, UUID, Flow: xtls-rprx-vision, Security: Reality, SNI, Fingerprint: chrome, Public Key, and Short ID all matching vpn.how exactly.
Important notes
- Always use connection data from your vpn.how personal account.
- Any typo in SNI, Public Key, Short ID, or UUID will cause connection errors.
- Flow must be set exactly to “xtls-rprx-vision” if specified in vpn.how.
Possible problems and solutions
- “bad request” error — double-check Flow and UUID entries.
- Handshake failure — verify SNI, Public Key, Short ID, and Fingerprint fields.
- No connection without clear errors — re-check server address and port against vpn.how.
Step 6: Connecting and Verifying Your New IP
Goal
Connect to your VLESS+Reality VPN profile and confirm that your traffic routes through the vpn.how server.
Step-by-step
- Open v2rayNG and select your VLESS+Reality profile (imported or manually created).
- Tap the big “Connect” button (usually a play icon at the bottom).
- When prompted with “Allow VPN connection,” tap “OK.”
- Wait until the status shows “Connected” or a VPN key icon appears in the Android status bar.
- Open your browser and check your IP on any IP check service or use v2rayNG’s built-in IP check if available.
Tip: When connecting for the first time on mobile data, disable data saver and battery saver modes for v2rayNG. This improves connection stability.
⚠️ Warning: If your Wi-Fi network requires web portal login (captive portal), complete that authorization without VPN first, then enable VPN. Otherwise, connection may fail.
✅ Checklist: Connection status shows “Connected,” the Android VPN icon is visible, and IP checking sites show your VPN server’s IP instead of your real IP.
Possible problems and solutions
- Connection error — recheck profile parameters from vpn.how; switch between Wi-Fi and mobile data.
- No internet after connecting — check client DNS settings or restart the connection.
- Traffic limit reached — confirm your plan and server are active and quota hasn’t been used up.
Verifying the Result
Checklist
- VLESS+Reality profile is added and selected.
- v2rayNG shows “Connected” status.
- Your new IP is confirmed on IP checking websites.
- Websites and apps load stably.
- Connection speed meets expected network and server performance.
How to test
- Open several websites and ensure they load quickly.
- Check your IP address. It should be different from your real one.
- Open any messenger app and send a message.
- If you need UDP (for gaming or calls), enable it in client settings and test a voice call.
Tip: Run a quick SpeedTest with VPN active to gauge bandwidth. Compare with speeds without VPN, considering encryption and routing.
✅ Checklist: All checklist items are met. Connection is stable, IP changed, and traffic routes through vpn.how server.
Common Issues and Fixes
- Problem: Won’t connect, "handshake failed." Cause: Incorrect SNI, Public Key, or Short ID. Fix: Verify with vpn.how and correct typos. Check Fingerprint is set to chrome.
- Problem: "bad request" error. Cause: Wrong Flow setting. Fix: Set Flow to “xtls-rprx-vision” exactly as in vpn.how.
- Problem: Connects but no internet. Cause: DNS conflict or battery saver mode. Fix: Enable built-in DNS in client or restart network; disable background activity limits for v2rayNG.
- Problem: Clipboard import doesn’t recognize link. Cause: Clipboard contains other text. Fix: Re-copy the vless:// link from vpn.how and retry import.
- Problem: QR code won’t scan. Cause: Poor lighting or screen glare. Fix: Enlarge QR code, boost brightness, move camera back, or use link import method.
- Problem: "ID not valid" error. Cause: Incorrect UUID. Fix: Copy UUID from vpn.how again and paste without extra spaces.
- Problem: Slow speed. Cause: Network congestion, weak signal, or overloaded server. Fix: Switch to another Wi-Fi or mobile network, change server in vpn.how, or try a different time.
- Problem: Disconnects after a few minutes. Cause: Android battery saving. Fix: Remove battery restrictions for v2rayNG and allow background operation.
- Problem: Doesn’t work on corporate network. Cause: Strict filters and proxies. Fix: Try mobile data or different server/port from vpn.how.
- Problem: App doesn’t save profile. Cause: No storage permission or data cleared. Fix: Allow storage access and avoid using cache cleaners that clear app data.
Extra Features
- App-based VPN routing: In v2rayNG, enable "Per-app proxy" and select which apps should go through VPN or be excluded.
- Auto-start and auto-connect: Set v2rayNG to connect automatically on device startup for continuous protection.
- Kill Switch (if available): Enable firewall or “VPN-only” mode to prevent data leaks if VPN disconnects.
- UDP support: Enable UDP forwarding in profile/client settings for games or calls and test it.
- DNS settings: Use reliable resolvers (e.g., DoH/DoT) inside the client to bypass local DNS blocks.
- Profile backups: Export profiles to files for easy transfer to other devices or recovery after resets.
- Alternative clients: Besides v2rayNG, apps like NekoBox offer modern interfaces with Reality support. Still, v2rayNG is the most popular.
Tip: Store exported profiles securely since they contain private server access data.
FAQ
- How to set up VLESS+Reality on Android fastest? Use the QR code import from vpn.how via v2rayNG: tap "+" → "Scan QR code" → confirm import → connect.
- Where do I find UUID, SNI, Public Key, and Short ID? In your vpn.how account under “VLESS+Reality.” Don’t use third-party sources—only data from your account.
- Can I use one profile on multiple devices? Usually yes, but check vpn.how’s policies and limits. It’s better to create separate profiles for each device in your account.
- Do I need to enable TLS? For VLESS+Reality, enable "Security: Reality," not classic TLS. Use parameters from vpn.how.
- What if speeds are slower than expected? Check your network (Wi-Fi vs mobile), server load, time of day, toggle UDP on/off, or try a different vpn.how server.
- Does this work on older Android versions? Yes, generally Android 7+ works, but Android 10+ is recommended. On older versions, check v2rayNG compatibility and grant all permissions.
- Why do some apps bypass VPN? Check if per-app proxy is enabled in v2rayNG and ensure target apps are included in VPN routing.
- How to quickly verify correct setup? Launch VPN, look for the key icon in the status bar, and check your IP at an IP lookup site. It should differ from your real IP.
- What’s the difference between v2rayNG and NekoBox? Both support VLESS+Reality. v2rayNG is more widespread; NekoBox offers a more modern interface. Choose based on your preference.
- Should I change the Fingerprint setting? No, use “chrome” if vpn.how specifies it. Changing the fingerprint might cause compatibility issues.
Conclusion
You’ve successfully set up VLESS+Reality on Android through vpn.how: installed v2rayNG, imported your profile conveniently via QR code, vless:// link, or manually, connected, and verified your new IP. Your traffic now flows securely and invisibly through Reality, and all key parameters come from a trusted source — your vpn.how personal account.
Next steps: add a second server if needed, set up auto-connect and app-specific routing, backup your profile, and periodically check your vpn.how account for updates.
Future growth: explore alternative clients like NekoBox and advanced DNS/UDP options. Master profiles for various scenarios — work, streaming, gaming — and switch easily with one click. Don’t forget security: keep your device updated and never share profile data with others.
